ArcPanel backs up every user each night from the moment it is installed. This guide shows where those backups go, how to keep copies off the server, how to add incremental snapshots with restic, and how to restore.
What the nightly backup does
At 05:10 server time, ArcPanel backs up every user that is not suspended. Each backup is one archive per user, named alice.2026-10-23_05-10-01.tar, in /backup on the server. It holds:
- the web domains with their files (without the
logsfolders); - DNS zones, mail domains with their mailboxes, databases and cron jobs;
- the other folders of the user's home directory;
- the data of the user's Docker apps.
How many archives are kept is set by the user's package: the Backups field of the package (the default package keeps 1). When a new backup is made, the oldest ones beyond that number are deleted.
Warning
With the default settings, the only copy of a backup is on the same server. Add a remote host (below) so that a lost disk or server does not take the backups with it.
The backup needs free disk space of about twice the size of the account; when there is not enough, it stops and the user gets an e-mail "backup failed". When the server is busy (the load average is at or above the number of CPU cores), backups wait until it calms down.
Make a backup now
- Open Backups in the sidebar.
- Click Create Backup. The job runs in the background; you get a notification when the archive is ready.
Administrators and resellers can pick the user in Owner first. Each archive in the list has Download, Restore and Delete.
From the command line, as root:
v-backup-user alice
Leave things out
Open Backups, then the Backup Exclusions tab. Each field takes one entry per line:
| Field | Example | Meaning |
|---|---|---|
| Web Domains | example.com:public_html/cache:public_html/tmp |
Skip these folders of example.com |
| Mail Domains | example.com:info:support |
Skip these mailboxes |
| Databases | alice_logs |
Skip this database |
| User Directories | downloads |
Skip this folder of the home directory |
* on its own line skips everything of that kind. Exclusions apply to the nightly archives; restic snapshots take the whole home directory and skip only the excluded databases.
Send backups to a remote host
- As administrator, open Server, then Configure, then the Backups tab.
- Turn on Remote Backup and choose a Protocol:
- SFTP or FTP: Host, Port, Username, Password and Directory;
- Backblaze B2: Bucket, Application Key ID and Application Key;
- Rclone: Remote, the name of a remote in root's rclone configuration, and Directory.
- Save. From the next run, each archive is also uploaded there.
Keep Local Backup on if you want a copy on the server as well. On the same tab, Compression chooses zstd (the default) or gzip, and Compression Level how hard it works.
The same with the command line, for an SFTP host:
v-add-backup-host sftp backup.example.com backupuser 'the-password' /srv/backups 22
Tip
Use an account on the remote host that can write only to its backup folder, so that a compromised panel cannot delete other data there.
Add incremental snapshots with restic
Restic snapshots are deduplicated and encrypted, so you can keep many of them for little space. They cover each user's home directory, Docker app data, and a dump of the databases and account settings made just before each snapshot.
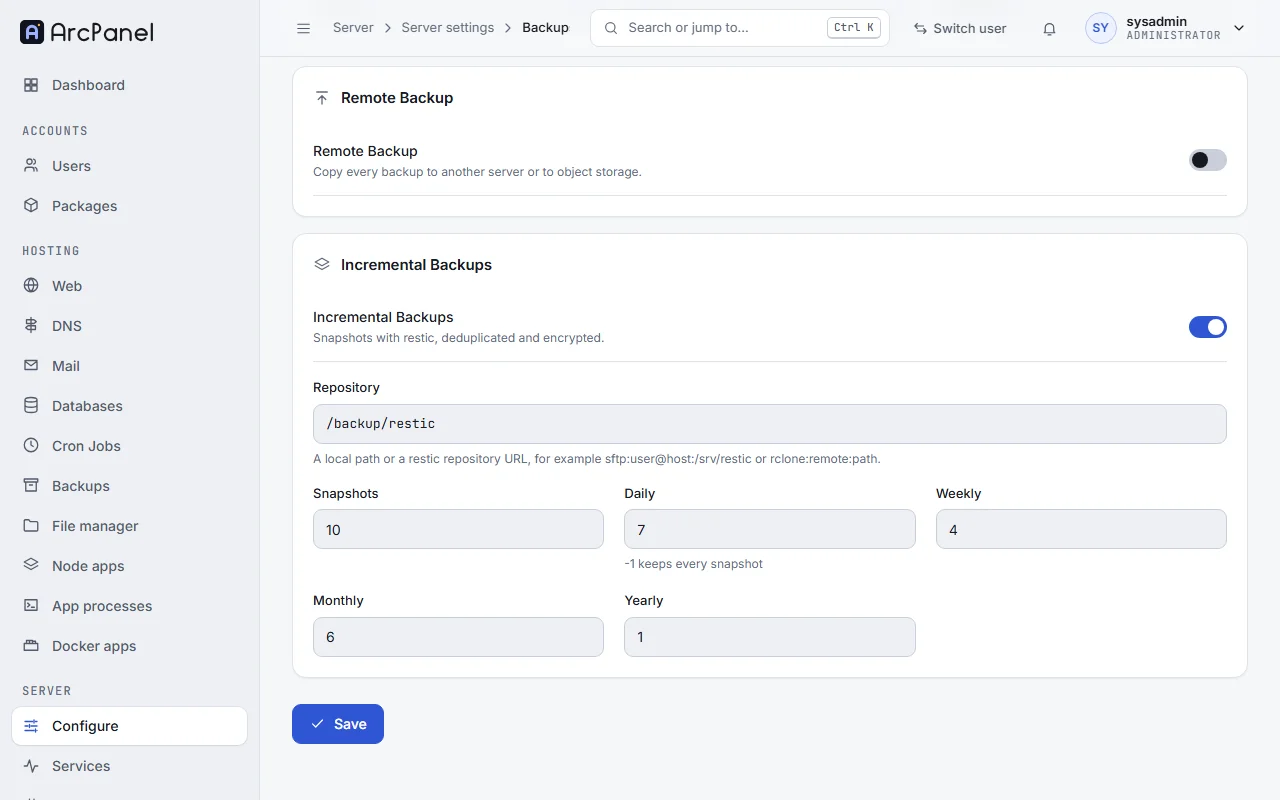
- As administrator, open Server › Configure › Backups and turn on Incremental Backups.
- Fill in Repository: a local path such as
/backup/restic, ansftp:user@host:/pathaddress or anrclone:remote:pathaddress. A local folder must exist before you save; create it first withsudo mkdir -p /backup/restic, or saving fails with "Directory … does not exist". - Set how many snapshots to keep: Snapshots in total, and how many Daily, Weekly, Monthly and Yearly ones (
-1keeps every snapshot of that kind). Fill in all five, then Save. - In Packages, edit the package of the users who should get snapshots and turn on Incremental backups.
Users of that package now see a Snapshots tab under Backups, with Create Snapshot, and Restore, Browse Files and Delete for each snapshot.
Create Snapshot queues a snapshot; the backup queue runs every five minutes, so it appears in the list a few minutes later. In ArcPanel 2.2, snapshots are made only this way, although the page says they are created every night: the nightly job makes archives only. To take snapshots of every user each night, add this line to root's crontab (sudo crontab -e):
30 5 * * * /usr/local/arcpanel/bin/v-backup-users-restic
Restore
From an archive: open Backups and click Restore next to the archive. Then either:
- Restore All, which replaces the current websites, mail, databases and files of the user with the ones in the backup; or
- tick what you need under Web Domains, DNS Domains, Mail Domains, Databases, Cron Jobs and User Directories, and click Restore Selected.
From a snapshot: open Backups › Snapshots, click Restore next to the snapshot and restore the items you need, or use Browse Files to bring back single files.
Caution
A restore overwrites what is there now. If you are not sure, make a backup first, so you can go back.
From the command line, with the archive in /backup:
v-restore-user alice alice.2026-10-23_05-10-01.tar
Archives from HestiaCP and VestaCP
ArcPanel restores user archives made by HestiaCP, VestaCP and ArcPanel 1.x. Copy the archive to /backup on the ArcPanel server and restore it with v-restore-user; the user is created if it does not exist yet. This is how you move accounts from an old server: there is no in-place upgrade.
Next steps
- Download an archive now and then and keep it somewhere else.
- Test a restore on a spare user before you need one.
- Read Set up mail and DNS if you have not yet.